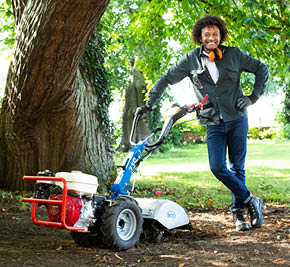
If your lawn is getting waterlogged or the contents of your flower beds are looking unhealthy, it could be that the soil is just too compact. However, the thought of breaking it up and turning it over with a fork is daunting. Fortunately, there's an easier way: using a rotavator! You can hire them from Speedy, the UK’s number one hire company.
How to Safely Use a Rotavator - Preparation
Before you use the rotavator, you must wear the correct PPE. Eye protection, safety boots, and gloves are essential, and we’d also recommend using ear defenders. Any PPE you do require can be purchased from Speedy.
Speedy Top Tip! Please Watch our How-To Use a Rotavator Video below:
HIRE ROTAVATORS FROM SPEEDY HIRE
Speedy's range of rotavators make light work of breaking up compacted soil and turning it over, bringing all of the nutrients to the surface and improving drainage. The benefits this can have on your new lawn or flower bed are huge.
Our machines run off normal unleaded petrol and refuelling them can be done by removing the cap and filling up the tank. After use, the engine can get really hot, so if you need to refuel, you should always allow the engine to cool down, as refuelling when the engine is hot can be really dangerous.
- Read our blog on how to rotavate your garden for a full guide
Site Preparation
Now that you're well-versed in how rotavators typically work and ensuring it's fueled up, you'll need to make sure your garden is ready to use your rotavator on.
First, make sure that you've cleared any debris. Old bricks, twigs, branches, and stones can either jam the blades of a rotavator or get thrown, causing a safety risk for you and others nearby. We also recommend strimming any long weeds first. If you don't, when you use the rotavator on them, the blades can chop the roots up and spread the root problem across a larger part of your garden. That's the last thing you want!
Finally, make sure the soil is moist. If it's the middle of summer, the ground might be too hard and your rotavator won't be as effective unless you pre-water the soil. On the other hand, if the soil is too wet after very heavy rain, the rotavator can smear and compact the soil, giving you the opposite results to the ones you're wanting.
The parts of a rotavator
All of the controls can be found on the handlebar, and although it looks complicated, it’s actually really easy to use.
The lever is your on and off control. In order to start the machine you will need to turn it to the 'on' position. When you are done with the rotavator, putting it into the off position will cut the engine.
The parking brake, when pulled, will lock the wheels and stop the rotavator from moving.
On the handle you will find a red lever; this is a safety switch. This will need to be compressed in order to operate the machine. Releasing this lever will stop the blades from spinning and the rotavator from moving.
A rotavator works a little bit like a car, it has a clutch and gears. The trigger will lift the flywheel up, essentially the equivalent to pressing the clutch pedal in your car and will allow you to select a gear. Don’t worry as rotavators usually only have two gears, forwards or reverse, which can be activated by moving the gear selector either backwards or forwards. Once you have selected your gear you will need to release your grip on the clutch trigger and the machine will move in the direction you’ve have selected.
This small silver lever is the throttle control. Down for fast, back up for slow.
Once you have the rotavator into position and you’re ready to start rotavating, you will need to compress the clutch again, but this time use this gear stick here which is for the blades. When you release the clutch, the machine will drive forwards and the blades will begin spinning.

Using a Rotavator
To begin with, you'll need to open the fuel lines by sliding the fuel cut off lever to the right. Then you will need to activate the choke by sliding it to the left. Now you can pull the start cord. Don’t worry if it doesn't start straight away, as it might take a couple of pulls. Once the engine has started slide the choke lever back to the right.
With the rotavator powered up, you then need to walk slowly behind the machine and let it do the work. The rotating blades will pull it forward and slowly break up and turn over the soil.
And don’t forget to keep children and pets well clear when operating this equipment.
If you have any issues with any of the products you hire from Speedy, just give your local Service Centre a call, as we are always available to help, and remember to always check the safety and operating guidance before you use any hire product.
The soil is too hard and my rotavator isn't doing anything!
If this sounds like you, don't worry, you're not the first person. When the soil is too hard, the blades may not be able to dig into the soil on first attempt. Hold the machine back slightly and allow the blades to continue to dig into the same bit of soil. Eventually, you'll find they can dig into the soil and begin turning it over.
It's generally recommended that you wait until soil is moist, but not damp, before rotavating. This ensures that the rotavator doesn't bounce along the surface as it will on dry soil, or smear the soil if it's too wet. You can always pre-water dry soil to make it moist with a watering can.
Making sure that the soil is damp also helps take some of the effort out of rotavating your garden, as you don't need to hold the rotavator back as much to have it dig into the soil.
Ready for more DIY tips?
A couple of good things to remember when hiring from Speedy. All our hire equipment is checked, tested, cleaned and serviced before every hire and will all come ready to go. You will also notice a folder attached to your hire product, these are safety and operating instructions, please make sure you read these before you begin your job.
Want to find out how to rotavate your garden? Check out our How to Rotavate your Garden blog. If you're looking at giving your garden a bigger landscaping makeover, you may also be using a rotavator as part of laying new turf or leveling your garden.
You’ll find all the power tools and hire equipment you need right here. Why not start planning your next DIY project today and open a Speedy account online or instore for all your tool hire needs?
- 2026
- November 2026 (1)
- September 2026 (1)
- August 2026 (1)
- July 2026 (3)
- June 2026 (1)
- May 2026 (2)
- April 2026 (1)
- January 2026 (6)
- 2025
- December 2025 (2)
- November 2025 (5)
- October 2025 (6)
- September 2025 (6)
- July 2025 (3)
- June 2025 (6)
- May 2025 (12)
- April 2025 (24)
- March 2025 (12)
- February 2025 (7)
- January 2025 (4)
- 2024
- October 2024 (3)
- September 2024 (4)
- August 2024 (8)
- July 2024 (8)
- June 2024 (14)
- May 2024 (8)
- April 2024 (5)
- March 2024 (14)
- February 2024 (4)
- January 2024 (9)
- 2023
- December 2023 (10)
- November 2023 (6)
- October 2023 (5)
- September 2023 (6)
- August 2023 (19)
- July 2023 (16)
- June 2023 (13)
- May 2023 (15)
- April 2023 (13)
- March 2023 (12)
- February 2023 (11)
- January 2023 (5)
- 2022
- December 2022 (4)
- November 2022 (9)
- October 2022 (13)
- September 2022 (10)
- August 2022 (8)
- July 2022 (9)
- June 2022 (14)
- May 2022 (9)
- April 2022 (8)
- March 2022 (5)
- February 2022 (4)
- January 2022 (2)
- 2021
- December 2021 (7)
- November 2021 (9)
- October 2021 (1)
- September 2021 (1)
- August 2021 (3)
- July 2021 (2)
- June 2021 (4)
- May 2021 (1)
- April 2021 (1)
- March 2021 (2)
- February 2021 (1)
- January 2021 (1)
- 2020
- 2019
- 2017
- 2016
- 2014
- 2013
- 2012
- 2011